There are many ways we can run a Plex Media Server (PMS). These methods include running it on bare metal, in a Virtual Machine, on a NAS, or using Docker.
However, an official way to run a PMS using Kubernetes as an orchestration platform has long been missing… Until now!
If you know what Kubernetes is and you’re passionate enough about it to bring your day job home with you, then this blog post is for you!!
If you have no clue what Kubernetes is, that’s okay too!
You can join in on the fun with the rest of us. 😀
Kubernetes (also known as k8s for short) is a system for automatically running, scaling, and managing the lifecycle of your containerized applications. K8s is typically run as a control plane managing one or multiple worker nodes and will take care of scheduling the containers to run based on the job definition. This makes it a really popular method to run applications on cloud platforms like AWS, Azure, GCP, and other platforms.
At Plex, we use Amazon’s Elastic Kubernetes Service (EKS) to run most of our services including our internal test PMS instances and also to hold all of our internal presentation recordings, and pictures from our team meetups. My personal preferred way of running PMS at home is using a nice and simple Docker Compose file.
It’s nice and easy to use, I can define all the other applications I want to run in the file, I can easily-ish move my applications from running on one host to another without needing to re-install and configure each piece of software individually, and I don’t need to manage a k8s cluster at home. (I’m not nearly as impacted by k8s Stockholm Syndrome as my other teammates…yet. 😉)
Application configurations are often packaged as a bundle of declarative yaml files called Helm Charts, which can then be deployed in your k8s cluster just like any other application in your system. A number of people have created various charts over the years to deploy PMS that have been maintained and function to varying degrees. In fact, one of my Plex interview problems was to take one of the unmaintained broken ones and fix it to get PMS deployed. But most of them seem to have been abandoned and are no longer supported by the community.
There are a bunch of people who want to be able run their Plex Media Servers using Kubernetes, which can be seen from the several forum and Reddit posts, and the various Kubernetes manifests for Plex that have been created over the years by the community.
Open source software is a topic that’s very important to a lot of us here at Plex, and our team decided it’s time for us to not just use other open source projects but also to contribute back to, and to produce our own open source projects for the Plex community to benefit from. Enter our Helm Chart to deploy PMS!
We opted to build our chart from scratch rather than taking one of the not-quite working pre-existing ones and modifying it to suit our needs, this made it easier for us to make sure it was easy to use for our internal use cases (at least at first) and then add to it or leave it open to expansion by the community. For us, the chart had to meet the following criteria:
- be able to import / migrate a pre-existing PMS with minimal operator intervention
- be able to play back our meeting recordings, shared PlexCon photo galleries, and testing content from AWS S3 and Google Drive storage
- not lose the PMS database and cache files whenever the service gets updated
- support direct playback of media without falling back to our Relay Service
- be able to run custom sidecar containers and custom init containers
- not make our team cry when we wanted to deploy a new PMS instance
Overall this list comprises target objectives that we felt would be a great starting point for an official open source Helm Chart. Hopefully, this manages to avoid too many internet flame wars and immediate feature requests, but we are excited to start down this journey with the wider dev community.
The first step is to make sure that everything is all set before we start up the actual PMS instance.
Prerequisites
Before we get too far into this, a small disclaimer might be warranted. I know this is a blog post about how awesome it can be to get Plex running in a cluster, but I would probably suggest sticking to running your server using Docker instead. The main reason for this is the significant learning curve that comes along with managing and running your own cluster. But, if you really want to run a cluster, I’d suggest going to find some blog posts about getting a cluster setup that best fits your hardware and your use case, it’s a bit too broad of a topic for us to cover here, once you get that up and running come back and the rest of this post will be here for you. 😀
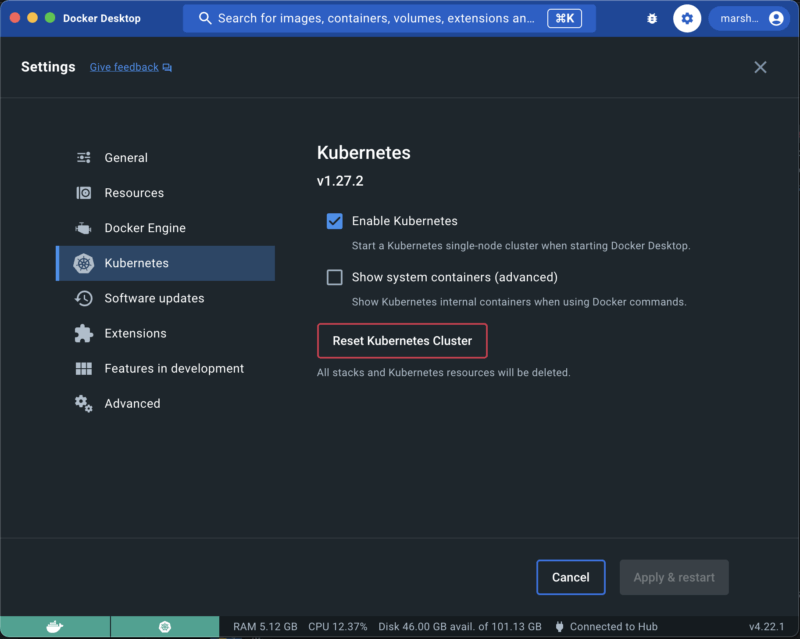
The first step is to have a Kubernetes cluster running. If you don’t have one then don’t worry, it’s really easy to start one locally for testing.
If you have a recent version of Docker Desktop installed, then there is already one built into that platform that you can use! (Note, you might have to enable it in settings to turn it on.)
Once that is set up and running, install helm using your favorite package manager (I will be using homebrew here for my example since I’m on a mac).
brew install helm
Next, you need to configure the helm repo so the chart can be fetched and installed:
helm repo add plex https://raw.githubusercontent.com/
plexinc/pms-docker/gh-pages
Once you have configured the helm repository you can create the values file that’s specific to your PMS instance.
How you configure the values will change a little bit depending on your cluster configuration. The configuration may be different if you’re starting a new server, if you’re migrating an existing server, and also based on where your media files are coming from.
In our example here I’ll run through both setting up a new example and creating a shiny ❇️ new ❇️ server.
Creating a new PMS
Creating a new server is a bit simpler since we are starting from scratch.
The first step will be to create a values.yaml file that contains your settings, you can find the default file here in the GitHub repository. That file contains all of the default values.
Here is our sample configuration called values.yaml in our current directory:
ingress:
    enabled: true
    # note put a domain name that points to your ip address here
    url: https://demo-pms.example.com
    ingressClassName: ingress-nginx
pms:
    configStorage: 10Gi
extraEnv:
    # This claim is optional, and is only used for the first startup
    of PMS
    # The claim is obtained from https://www.plex.tv/claim/ is
    only valid for a few minutes
    PLEX_CLAIM: "claim"
Note however that this makes a couple of assumptions:
- that you have an ingress controller configured on your cluster (this probably won’t be the case from Docker Desktop). For bare metal clusters, you’d need a Load Balancer, such as MetalLB to route your ingress traffic.
- that you don’t have another PMS instance running on port 32400 on your public IP address (this will cause the default .plex.direct resolution to resolve to your other PMS instance.)
- that you have port 443 forwarded to your cluster from your public IP address. Now we should be ready to start up our test PMS deployment to Kubernetes.
We can use the helm install command to install the chart:
helm install demo plex/plex-media-server -f values.yaml
To finish the setup we will need to connect directly to the PMS instance and finish setting it up using the web browser. If we have not yet set up an ingress or claimed the server then we can use this command to port forward to it:
kubectl port-forward service/demo-plex-media-server 32400:32400
Then we can go to http://localhost:32400 and do the normal setup steps.
The only special settings that we will need to make sure to check are the ones related to external access: Remote Access and network > Custom server access URLs. The custom server access URL should have been set automatically, and it assumes that you have HTTPS set up on your ingress (which you should, with the popularity of tools like Let’s Encrypt there is no reason to not have it enabled), but it’s worth double-checking to make sure that the URL is correct and that it will actually route to your PMS instance (if not, something might be misconfigured with your ingress controller).
In order to keep things simple, it is recommended to set the Remote Access port to 443. By default, the PMS chart will use a Service type of ClusterIP, but you can configure a Service type of NodePort to expose the app directly. The options are present in the chart and you should decide what’s better for your particular setup after evaluating the pros and cons of each solution. The details of each of these settings are unfortunately outside the scope of this article, but please refer to the excellent k8s docs for more details. Now that we have our very own Personal Media Server up and running, we need to configure our k8s PMS for media access.
There are loads of ways that you can get your media to your server. For this example we did not want to have to think of all the different ways that someone might be storing their data and have their clusters configured. We decided that the simplest approach was to reuse an existing tool that can mount volumes: Rclone. There are many other ways to do this, so we suggest you do a little research based on your specific use case for how your media is stored.
Rclone is a really powerful tool that can mount a ton of different storage platforms as volumes, so we didn’t need to specifically account for all the different data sources that one might want to use. A normal Rclone configuration file should be used, we would recommend using the rclone config command to create the file.
Once the file is made you will need to set it in a Kubernetes secret (you can create the secret directly or use your preferred utility, such as sealed secrets or external secrets) and then set the secret name in your values.yaml file in the rclone.configSecret.
Sample portion of the values.yaml file for the Rclone configuration:
  rclone:
   enabled: true
   configSecret: "demo-pms-rclone-config"
   remotes:
   - "pictures"          		# sample from google drive
   - "videos:demo-content/videos"       # sample from an S3 bucket
Corresponding sample Rclone config file for Google drive and for S3:
[pictures]
type = drive
scope = drive.readonly
token = TOP SECRET
team_drive = TOP SECRET

[videos]
type = s3
provider = AWS
env_auth = true
region = us-east-1
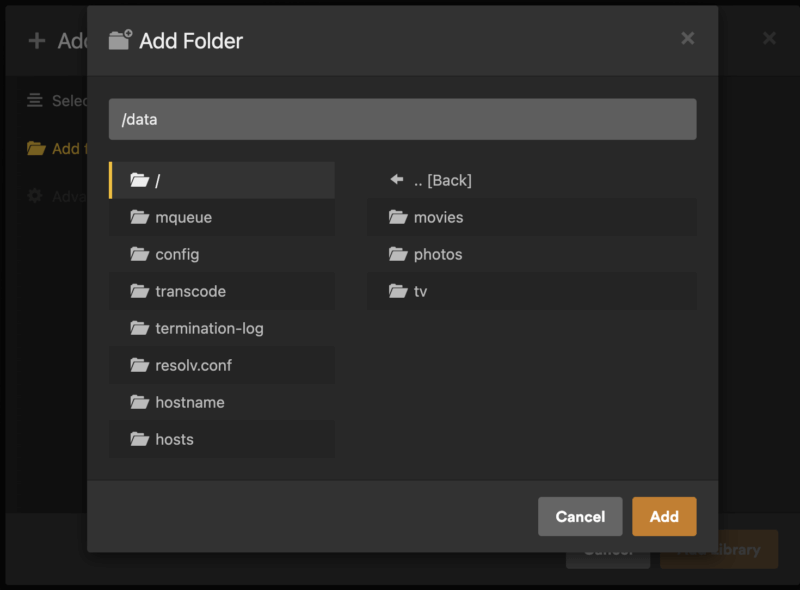
Once you have that added, updating the helm chart will start Rclone sidecars for you to mount the volumes into your PMS container. Then set up the new media libraries using the UI, same as you would with any other installation method!
And the final (and probably most important) step: sit on the couch and start watching your favorite movies or TV shows!
Migrating an existing installation
You might be asking yourself, what if I am already running a Plex Media Server and I want to join the cool kids club with Kubernetes? Not a problem, you’ve come to the right place!
If you already have a Kubernetes cluster running locally—fantastic, that’s the first step done!
Once you have your cluster set up, your next step is probably to follow most of the same steps from the new server setup section to make sure that your media volumes can be mounted correctly. Once that is all set you should clean up all your testing resources—especially the persistent data volumes. There is a little bit of downtime involved to do the actual migration while the metadata gets moved over.
Steps:
- Disable the empty trash setting in PMS
- Stop your existing PMS instance
- Create a tar.gz from the plex data directory tar -czvf pms.tgz
(this should be at the Library directory level) - Copy the tar file over to your local machine
- Add the following block in your values.yaml file to make the chart wait for the archive to be uploaded and ready before starting the actual server
- Install the chart
- Copy the server data archive into the init container
- Once the file has finished uploading, rename it so it will automatically be processed by the init container
- Wait for the archive to unpack and for the server to start up
- Once it is up and running you may need to do the same updates through the plex UI of the external access settings: Remote Access and network > Custom server access URLs. And you may also need to move the references to the library media locations
- Enable the empty trash PMS setting
  initContainer:
    script: |-
      #!/bin/sh
      echo "waiting for pre-existing pms database to uploaded..."

      if [ -d "/config/Library" ]; then
        echo "PMS library already exists, exiting."
        exit 0
      fi

      # wait for the database archive to be manually copied to the server
      while [ ! -f /pms.tgz ]; do sleep 2; done;

      tar -xvzf /pms.tgz -C /config
      rm pms.tgz

      echo "Done."
helm install demo plex/plex-media-server -f values.yaml
kubectl cp pms.tgz default/pms-plex-media-server-0:/pms.tgz.up -c demo-pms-plex-media-server-pms-init
kubectl exec -n default --stdin pms-plex-media-server-0 -c demo-pms-plex-media-server-pms-init h -- mv /pms.tgz.up /pms.tgz
Now you should have your exact same Plex Media Server running in Kubernetes! Congrats 🎉
What’s the catch?
In case you haven’t figured it out yet, there is always a catch. The main one being that running a Kubernetes cluster is a lot more involved than setting up most of the other systems with a fairly significant learning curve and amount of maintenance work that you need. (We have engineers who spend quite a bit of time coaxing our clusters into doing what we want.  ) But, if you already have a cluster running, it’s a nice way of being able to deploy one more of your applications using your existing infrastructure without needing to configure something new just for one app.
The main benefit and (limitation in this case) with k8s is auto-scaling. K8s works really well with scaling applications when their load changes and moving the containers around between different hosts in the cluster when it needs to. But PMS is not tailored for dynamically scaling the number of instances and you can only have one instance running at a time, so that’s not something you’ll be able to magically benefit from by switching your deployment method over to k8s here.
Thanks for reading and sharing our passion for Plex, personal media, Kubernetes, and open source!
Stick around and check out the rest of the awesome 2023 Plex Pro Week content!!! And feel free to open up some of your own pull requests on the PMS Helm Chart that can make it even better!

More Support
Need to start from the beginning? Here’s how to get your server up and running:
Intro to Plex
Quick-Start Guide to Server Set-Up
More on Plex Media Server Installation
More from Plex Pro Week ‘23